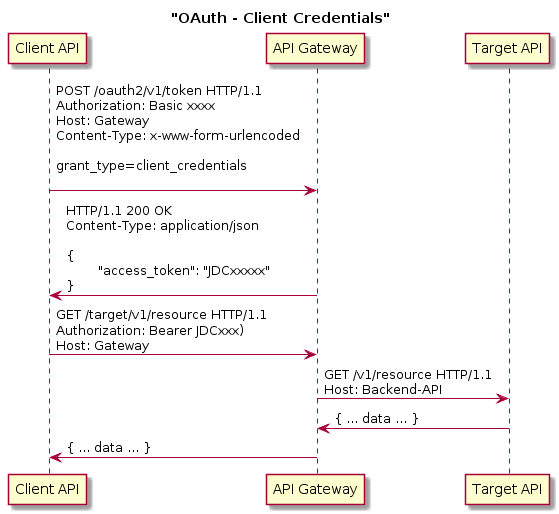
Many of the APIs available via the API Gateway are protected using the Client Credentials OAuth flow. This simple flow requires 2 steps in order to successfully use the protected API.
Client Credentials - Sequence Diagram
The diagram below details the typical sequence of requests made by a client (which could be a server application or another API).

Step 1 - OAuth Token generation
The OAuth token is valid for a period of time. By default this is 1 hour (3600 seconds), but this can be configured based on the application. Therefore it is acceptable to re-use the same token for many calls to the target API.
To generate the token, make an HTTP POST call to the /token endpoint.
POST /oauth2/v1/token
Accept: */*
Authorization: Basic <Base64 encoded credentials>
Content-Type: application/x-www-form-urlencoded

grant_type=client_credentials
Note:
- The request must be a POST.
- The Content-Type header must be application/x-www-form-urlencoded
- The Authorization header must be populated.
- The grant_type form parameter must be set to client_credentials.
- Optionally a scope form parameter may be provided to restrict the scope of the returned token.
Populating the Authorization header
The authorization header is treated as supplying basic credentials. These credentials are only encoded (not encrypted) and so should never be submitted to any API other than the OAuth /token endpoint.
To construct the basic header, the Consumer Key and Consumer Secret values are concatinated together, separated using a colon (:) and then base64 encoded.
The following pseudo code indicates how the basic auth value is calculated
var headerBasic = consumerKey + ":" + consumerSecret;
var headerBase64 = base64Encode(headerBasic);
var headerValue = "Basic " + headerBase64;
The header may then be set in the request (pseudo code)
headers.add("Authorization", headerValue);
The Authorization server's response will be similar to the following:
HTTP/1.1 200 OK
Connection: keep-alive
Content-Length: 576
Content-Type: application/json
Date: Tue, 12 Mar 2019 16:55:36 GMT
Server: Apache
{
  "refresh_token_expires_in": "0",
  "api_product_list": "[psd2-stet-v1]",
  "api_product_list_json": [ "psd2-stet-v1" ],
  "organization_name": "bnpinternet",
  "developer.email": "...",
  "token_type": "BearerToken",
  "issued_at": "...",
  "client_id": "...",
  "access_token": "9tTeVWjNBcQ3DswGDqfVVAfTawSX",
  "application_name": "...",
  "scope": "pisp piisp aisp extended_transaction_history",
  "expires_in": "1799",
  "refresh_count": "0",
  "status": "approved" }
Step 2 - API request with access_token
The next step is to make one or many calls to the target API including the access_token element from the token generation result.
Assuming you are using an API called 'HelloWorldApi' which is available via the API Gateway, you use the access_token gained from Step 1. above in request as follows:
GET https://api.cib.bnpparibas.com/HelloWorldApi
Accept: application/json
Authorization: Bearer <access_token>
Note that the Authorization header is no longer "Basic" rather it is now "Bearer".